Microsoft Stream is a video-sharing service designed for businesses and organizations to upload, manage, and share videos securely within their enterprise. It’s part of the Microsoft 365 suite, making it easy to collaborate with your team using video content. Whether you’re sharing training videos, presentations, or meetings, Microsoft Stream offers an intuitive platform for video management. Here’s how to get started.
1. Accessing Microsoft Stream
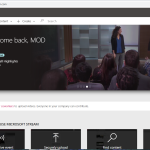
To access Microsoft Stream, simply log in to your Microsoft 365 account. From the app launcher (the grid icon in the upper-left corner), select Stream. If it’s not listed, search for it in the search bar at the top of the screen.
2. Navigating the Interface
Once in Microsoft Stream, you’ll see a dashboard featuring several options:
- My Content: View videos you’ve uploaded, channels you follow, and groups you belong to.
- Create: Use this to upload videos or record directly from your device.
- Discover: Browse videos shared across your organization.
3. Uploading a Video
To upload a video:
- Click on the Create button at the top of the page.
- Select Upload video from the dropdown.
- Drag and drop your video file or browse your device to select it.
- While the video uploads, you can add details such as title, description, and hashtags for easy discoverability.
- Set permissions. You can choose who in your organization can view the video—either specific groups, individuals, or the entire company.
- Once uploaded, click Publish.
4. Organizing Content with Channels and Groups
Microsoft Stream allows you to organize videos into Channels and Groups to ensure your team can find content easily.
- Channels: These are like playlists or folders where you can group related videos. For example, you could create a “Training Videos” channel for all onboarding materials.
- Groups: Groups are based on Microsoft 365 Groups, and videos can be associated with these groups for targeted sharing. You can create groups around specific teams, departments, or projects.
5. Recording Videos
You can record videos directly from your device or even record screen captures:
- Click on Create and choose Record screen or video.
- Follow the prompts to select whether you want to record your screen, your webcam, or both.
- After recording, you can review, trim, and save the video to Microsoft Stream.
6. Sharing Videos
Once your video is uploaded or recorded, sharing is straightforward:
- Go to the video you want to share and click Share.
- You can copy the direct link to the video or share it with specific groups or individuals within your organization.
- You can also embed videos into SharePoint, Teams, or other applications by clicking the Embed option.
7. Search and Discover Content
Stream’s powerful search function lets you find videos easily. You can search by title, description, or even keywords spoken in the video itself, thanks to automatic transcription. This is particularly useful when trying to find specific points in long recordings or meetings.
8. Analytics and Engagement
Stream provides insights into how your videos are performing. You can see view counts, comments, and likes, helping you gauge engagement. For training videos, this is especially useful in understanding whether your content is reaching the intended audience.
9. Security and Permissions
Since Microsoft Stream is integrated with Microsoft 365, it adheres to the same high standards of security and compliance. You have full control over who can view, upload, and share content within your organization. You can also assign different levels of permissions based on roles and departments.
Extra posts:
 Create live Event with Microsoft Stream
 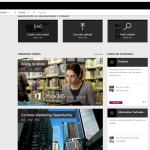 Video Stream from Microsoft
  Microsoft Stream mobile app is now available for Android & iOS
  Microsoft 365 Admin Center Overview for Beginners
 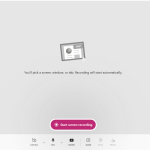 Recording Videos Using Microsoft Stream
  How to Remove Expiration from Microsoft Teams Recordings (OneDrive/SharePoint and Stream)
Good blogs thanks
Comments are closed.