
Creating screen recordings with audio has become essential for content creators, educators, gamers, business professionals, and remote workers. Whether you’re recording a software tutorial, an online class, a gaming session, or a presentation, capturing both your screen and audio simultaneously ensures a more engaging and informative experience for your audience.
Windows 11 offers several built-in and third-party solutions that make screen and audio recording easier than ever. If you’re wondering how to record audio and screen together in Windows 11, this comprehensive guide will walk you through the best methods, settings, and tips to achieve high-quality recordings.
Why Record Screen and Audio Together?
Screen recordings become much more valuable when accompanied by audio. Voice narration helps explain what’s happening on the screen, while system audio captures application sounds, video playback, notifications, and game effects.
Common use cases include:
- Creating video tutorials
- Recording online meetings
- Capturing gameplay sessions
- Producing educational content
- Demonstrating software features
- Recording webinars and presentations
- Creating troubleshooting guides
By recording both visual and audio elements, you provide a complete viewing experience that is easier for audiences to understand.
Method 1: Use Xbox Game Bar to Record Screen and Audio
Windows 11 comes with Xbox Game Bar, a built-in screen recording tool that can capture screen activity along with audio.
Step 1: Open Xbox Game Bar
Press:
Windows + G
The Xbox Game Bar overlay will appear on your screen.
Step 2: Configure Audio Settings
Before recording:
- Open the Audio widget.
- Select your microphone.
- Ensure system audio is enabled.
- Adjust microphone volume levels.
Step 3: Start Recording
Click the Record button or press:
Windows + Alt + R
The recording begins immediately.
Step 4: Stop Recording
Press:
Windows + Alt + R
again to stop.
Your recordings are automatically saved in:
Videos > Captures
Pros of Xbox Game Bar
- Free and built into Windows 11
- Easy to use
- Records microphone and system audio
- No additional installation required
Limitations
- Cannot record File Explorer or Desktop directly
- Limited editing features
- Not ideal for professional content creation
Method 2: Use Clipchamp Screen Recorder
Microsoft’s Clipchamp has become one of the most popular screen recording solutions for Windows 11 users.
How to Record with Clipchamp
- Open Clipchamp.
- Sign in to your Microsoft account.
- Select “Screen and Camera Recording.”
- Allow microphone permissions.
- Choose whether to record:
- Entire screen
- Specific window
- Browser tab
- Enable microphone recording.
- Click Record.
After recording, Clipchamp allows you to edit, trim, and export your videos directly.
Benefits of Clipchamp
- User-friendly interface
- Built-in video editor
- Supports voice narration
- Easy exporting options
- Suitable for YouTube content creators
Method 3: Record Screen and Audio with OBS Studio
For users seeking professional-quality recordings, OBS Studio is often the best choice.
Why OBS Studio?
OBS Studio offers advanced recording controls and is widely used by streamers, educators, and video creators.
Setting Up OBS Studio
Install OBS
Download and install OBS Studio from the official website.
Create a Scene
- Open OBS Studio.
- Click the “+” icon under Scenes.
- Create a new scene.
Add Screen Source
- Under Sources, click “+”.
- Select Display Capture.
- Choose the monitor you want to record.
Add Audio Sources
For microphone audio:
- Add Audio Input Capture.
For system audio:
- Add Audio Output Capture.
Start Recording
Click:
Start Recording
When finished, click:
Stop Recording
Advantages of OBS Studio
- Completely free
- High-quality video output
- Multiple audio tracks
- Custom recording settings
- Supports 4K recording
- Professional-grade features
Best For
- YouTubers
- Streamers
- Online instructors
- Businesses creating training videos
Adjust Audio Settings Before Recording
Regardless of the software you choose, proper audio setup is critical.
Check Microphone Quality
Go to:
Settings > System > Sound
Ensure:
- Correct microphone is selected
- Input volume is properly adjusted
- Noise suppression is enabled if available
Test Audio Levels
Record a short test clip before starting your final recording session.
Check for:
- Background noise
- Echo
- Distortion
- Low microphone volume
Tips for Better Screen Recordings
Use a Good Microphone
Even the best screen recordings can sound unprofessional with poor audio quality.
USB microphones often provide significantly better sound than built-in laptop microphones.
Close Unnecessary Applications
Extra applications consume system resources and may create unwanted notifications during recording.
Enable Do Not Disturb
Prevent pop-ups and notifications from appearing in your recording.
Go to:
Settings > System > Notifications
and enable Do Not Disturb mode.
Record in a Quiet Environment
Background noise can distract viewers and reduce video quality.
Choose the Right Resolution
For professional content:
- 1080p is recommended
- 1440p or 4K for premium tutorials
- 30 FPS for tutorials
- 60 FPS for gaming content
Common Problems and Solutions
No Microphone Audio Recorded
Possible causes:
- Microphone muted
- Incorrect input device selected
- App permissions disabled
Fix:
Go to:
Settings > Privacy & Security > Microphone
Ensure microphone access is enabled.
System Audio Not Recording
Check audio source settings in your recording software.
OBS users should verify Audio Output Capture settings.
Laggy Recordings
Solutions:
- Close background apps
- Lower recording resolution
- Reduce frame rate
- Update graphics drivers
Poor Audio Quality
Improve quality by:
- Using an external microphone
- Reducing room echo
- Increasing microphone gain carefully
- Recording in a quieter space
Which Screen Recorder Should You Choose?
Xbox Game Bar
Best for:
- Beginners
- Quick recordings
- Casual users
Clipchamp
Best for:
- Content creators
- Business presentations
- Educational videos
OBS Studio
Best for:
- Professional creators
- Streamers
- Advanced users
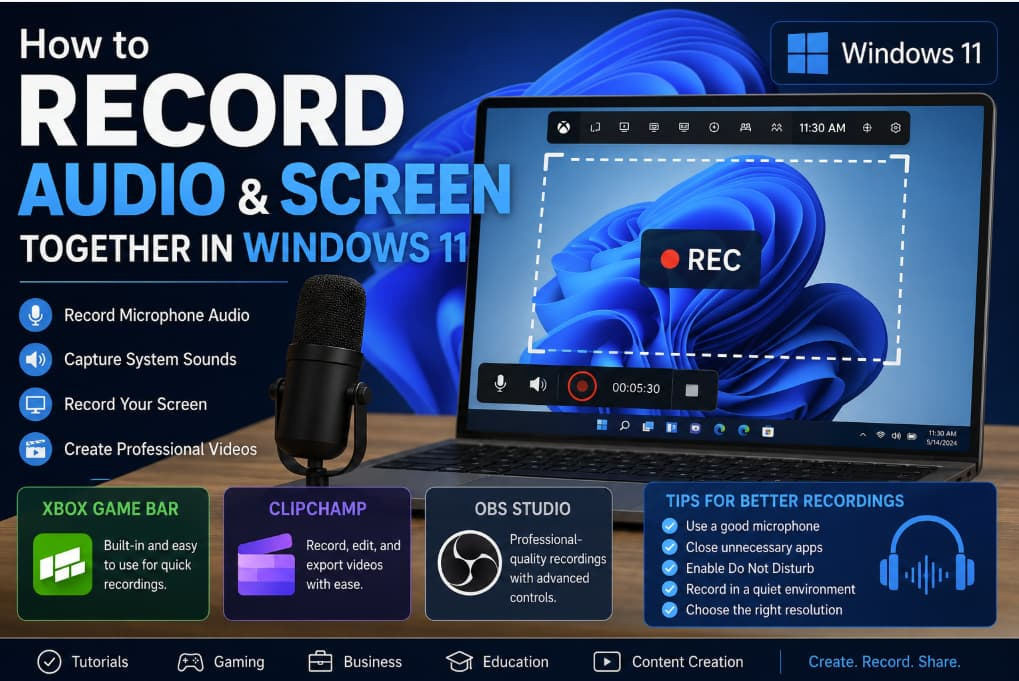
Recording audio and screen together in Windows 11 is easier than ever thanks to built-in tools and powerful third-party applications. Xbox Game Bar offers a simple solution for quick recordings, Clipchamp combines recording with editing capabilities, and OBS Studio provides professional-level control for serious creators.
The key to producing excellent screen recordings is not only choosing the right software but also ensuring your audio setup is optimized. Clear narration, balanced system audio, and a distraction-free environment can dramatically improve the quality of your videos.
Whether you’re creating tutorials, recording meetings, sharing presentations, or building a YouTube channel, mastering screen and audio recording in Windows 11 will help you produce engaging and professional content that viewers appreciate.
Extra posts:
 Boost Your Productivity with OneNote Transcribe, Record, and Summarize Meeting Audio Like a Pro
  Windows 11 File Explorer Tutorial: A Complete Beginner-to-Advanced Guide
  How to Use Windows Terminal Like a Pro: The Ultimate Guide for Developers, IT Professionals, and Power Users
  Customizing the Lock Screen in Windows 11 A Step-by-Step Guide to Personalize and Optimize
  How to Set Up Remote Desktop on Windows 11? A Beginner’s Guide
  Can I Rollback a Windows 11 Update? A Complete Guide to Reverting Windows Updates Safely