
Windows 11 gives the desktop a cleaner look with rounded corners, a centered taskbar, updated icons, and smoother visual effects. But if you spend hours working at your PC, the default appearance may not be exactly what you want.
Changing desktop icons is a simple way to make Windows 11 feel more personal—and it can be useful beyond aesthetics. Custom icons can make frequently used folders easier to spot, help separate work and personal projects, or give a carefully organized desktop a consistent visual style.
The good news is that you don’t need to modify the Windows Registry or install a complicated customization tool. Windows 11 includes built-in controls for changing system and folder icons, while custom .ico files give you much more flexibility.
Here’s how to change desktop icons in Windows 11, use your own icon files, customize folders, install icon packs, and troubleshoot common problems.
Why Change Desktop Icons in Windows 11?
A customized desktop isn’t just about making Windows look different. The right icon system can also improve how quickly you recognize files, folders, and applications.
Here are a few practical reasons to customize your icons:
- Improve visual organization: Use different icons for development projects, documents, media, or work folders.
- Create a consistent aesthetic: Match your icons to your wallpaper, Windows theme, or preferred color scheme.
- Reduce visual clutter: Minimalist icon sets can make a busy desktop easier to scan.
- Personalize your workflow: Gaming, creative work, software development, and office work can each have their own visual organization.
For professionals managing multiple projects, custom folder icons can be particularly useful. Instead of reading folder names one by one, a distinctive icon can provide an immediate visual cue.
How to Open Desktop Icon Settings in Windows 11
Windows 11 doesn’t put all desktop icon controls directly on the desktop context menu, so the settings can be easy to overlook.
To access them:
- Right-click an empty area of the desktop.
- Select Personalize.
- Click Themes.
- Scroll down to Related settings.
- Select Desktop icon settings.
The Desktop Icon Settings window lets you control several built-in Windows icons, including:
- This PC
- Recycle Bin
- Network
- Control Panel
- User’s Files
You can also choose which of these icons appear on the desktop by checking or clearing their corresponding boxes.
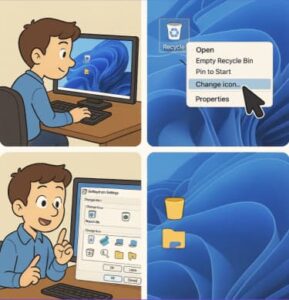
How to Change a System Desktop Icon
Once you’ve opened Desktop Icon Settings, changing an icon takes only a few clicks.
1. Select the icon
Click the system icon you want to modify, such as This PC or Recycle Bin.
2. Click “Change Icon”
Select Change Icon… below the list.
Windows will display a collection of available icons. Depending on the icon, these may come from Windows system resources such as shell32.dll.
3. Choose an icon
You can select one of the built-in options or use your own icon file.
For a custom icon, click Browse… and navigate to the folder containing your .ico file.
Select the file and click Open.
4. Apply the change
After selecting your preferred icon:
- Click OK.
- Click Apply.
- Click OK to close the Desktop Icon Settings window.
The desktop should now display the new icon.
If the change isn’t immediately visible, right-click an empty section of the desktop and select Refresh.
How to Use Custom .ICO Files
Windows desktop icons use the .ico format. Unlike regular images, an ICO file can contain multiple icon sizes, allowing Windows to display the artwork appropriately at different resolutions and interface sizes.
If you have a PNG or JPG image, you’ll need to convert it to ICO before using it as a traditional Windows desktop icon.
When choosing or creating custom icons, look for files with sufficient resolution. A poorly prepared small image may look blurry when Windows displays it at a larger size.
A good practice is to keep your custom icons in a permanent folder—for example, a dedicated Icons folder inside your Documents directory. Avoid storing icons on USB drives or temporary download locations. If Windows can no longer find the icon file, shortcuts or customized icons may revert or display incorrectly.
How to Change Folder Icons in Windows 11
You can customize individual folders independently of the system desktop icons. This is particularly useful when you have a large project directory or several folders with similar names.
To change a folder icon:
- Right-click the folder.
- Select Properties.
- Open the Customize tab.
- Under Folder icons, click Change Icon…
- Select one of the available icons or click Browse… to find a custom
.icofile. - Click OK.
- Click Apply and then OK.
The folder should now use your selected icon in File Explorer and, when applicable, on the desktop.
For example, you might use one icon for software projects, another for client documents, and a third for archived material. The goal isn’t to customize every folder indiscriminately; it’s to create visual signals that actually help you work faster.
Changing Shortcut Icons
Shortcut icons can also be customized, which is useful if you want a more consistent desktop.
Right-click the shortcut and select Properties. Depending on the shortcut type, look for the Shortcut tab and select Change Icon….
Choose an existing icon or browse to a custom .ico file, then click Apply and OK.
This works particularly well with a minimalist desktop where only a handful of carefully selected shortcuts are visible.
Using Windows 11 Icon Packs
If changing icons one at a time sounds tedious, you can use an icon pack.
Icon packs typically contain collections of .ico files designed around a common style. You might find minimalist, gaming, retro, monochrome, or productivity-focused sets.
When downloading icon packs, use reputable sources and inspect the files before opening or installing anything. An icon pack should generally contain image resources such as .ico files—not unexpected executable files.
Some third-party customization utilities can automate large-scale icon changes, but they aren’t required for basic Windows 11 personalization. Manual customization gives you more control and avoids adding unnecessary software to the system.
How to Create Your Own Windows 11 Icons
Creating your own icons is another option if you want something that matches a specific workflow or brand.
A simple process looks like this:
- Design the artwork in a graphics application such as Figma, Canva, or Adobe Illustrator.
- Start with a square canvas and keep the design recognizable at small sizes.
- Export the artwork as a transparent PNG.
- Convert the PNG to an
.icofile. - Apply the resulting icon using Windows’ built-in icon settings.
Keep the design simple. Desktop icons are relatively small, so intricate details can disappear when the icon is displayed at normal Windows scaling.
For professional environments, a small set of consistent shapes and colors can work better than dozens of highly detailed icons.
How to Restore the Default Windows 11 Icons
Changed your mind? Restoring the original icons is straightforward.
Open:
Personalize → Themes → Desktop icon settings
Then:
- Select the customized system icon.
- Click Restore Default.
- Click Apply.
- Click OK.
Windows will restore the original icon associated with that system item.
For customized folders, return to the folder’s Properties → Customize → Change Icon menu and select the default option.
Troubleshooting Windows 11 Icon Problems
Customization usually works without issues, but Windows can occasionally fail to display a change correctly.
The icon isn’t updating
First, refresh the desktop. If that doesn’t work, restart Windows Explorer.
Press Ctrl + Shift + Esc to open Task Manager, locate Windows Explorer, right-click it, and choose Restart.
The icon looks blurry
Check the source file. Low-resolution artwork can become pixelated when Windows scales it.
Use a properly prepared ICO file containing appropriate icon sizes rather than simply converting a tiny image.
The icon disappears after restarting
Check where the .ico file is stored. If you moved, renamed, or deleted the source file, Windows may no longer be able to locate it.
Store custom icons in a stable local directory and avoid relying on temporary folders or removable storage.
Icons keep reverting
If customizations repeatedly disappear, check whether a third-party customization utility, system-management policy, or synchronization process is resetting desktop settings. On managed business PCs, organizational policies may also limit certain personalization options.
Practical Takeaway: Build a Desktop That Works for You
Windows 11’s default interface is intentionally clean, but you don’t have to stop there. With Desktop Icon Settings, custom .ico files, folder customization, and shortcut controls, you can build a desktop that reflects both your personal style and the way you work.
Start small. Change This PC, Recycle Bin, or a few high-use project folders first. If the new system improves recognition and reduces clutter, expand it gradually.
For a polished setup, keep your icons consistent in size and visual style, store custom .ico files in a permanent location, and avoid installing third-party customization software unless you actually need its additional features.
A few minutes of customization can turn a generic Windows 11 desktop into a workspace that’s easier to navigate—and distinctly yours.
Extra posts:
 How to Change Taskbar Position and Icons in Windows 11 (Step-by-Step Guide)
  How to Reset Windows 11 Without Losing Files: A Complete Step-by-Step Guide
  Customizing the Lock Screen in Windows 11 A Step-by-Step Guide to Personalize and Optimize
  How to Clean Install Windows 11 — Step-by-Step (The Friendly, No-Nonsense Guide)
  Setting Up Windows Hello Face and Fingerprint Sign-In A Step-by-Step Guide
  How to Map Network Drives in Windows 11: A Complete Step-by-Step Guide