As applications grow in complexity and usage, performance and scalability become critical. One of the most effective strategies to improve responsiveness and reduce load on databases is caching. Among various caching patterns, Cache-Aside, also known as Lazy Loading, is a widely-used and simple approach.
In this post, we’ll explore the Cache-Aside pattern, why it’s useful, and how to implement it in Azure using Azure Cache for Redis.
What is Cache-Aside?
In the Cache-Aside pattern, the application code is responsible for loading data into the cache on demand. That means:
- The cache starts empty.
- When the application needs data:
- It first checks the cache.
- If the data is not in the cache (a cache miss), it fetches it from the underlying data store (e.g., Azure SQL Database or Cosmos DB), stores it in the cache, and returns the result.
- If the data is in the cache (a cache hit), it is returned immediately.
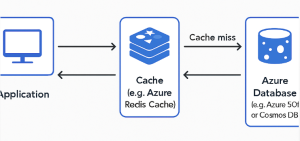
Visual Flow
mathematicaCopyEditApplication
   |
   |---> Check cache (Azure Cache for Redis)
             |
     Hit     |     Miss
     |       v
     |    Query DB (Azure SQL, Cosmos DB)
     |       |
     |    Update cache
     |       |
     ------> Return data
Why Use Cache-Aside?
- Improved performance: Faster data access with reduced database load.
- Cost-efficient: Only frequently accessed data is cached.
- Flexibility: Application controls when and what to cache.
However, you must also handle cache invalidation and staleness of data carefully. Updates or deletes in the database should be reflected in the cache to maintain consistency.
Implementing Cache-Aside in Azure
Let’s walk through implementing the Cache-Aside pattern using:
- Azure Cache for Redis
- Azure SQL Database
- .NET Core (for the example)
Prerequisites
- Azure Cache for Redis instance
- Azure SQL Database (or another persistent store)
- .NET Core application (or any backend service)
Step 1: Install Redis Client
For .NET Core, use the StackExchange.Redis package:
bashCopyEditdotnet add package StackExchange.Redis
Step 2: Connect to Azure Cache for Redis
csharpCopyEditvar redis = ConnectionMultiplexer.Connect("your-redis-name.redis.cache.windows.net:6380,password=yourAccessKey,ssl=True,abortConnect=False");
var cache = redis.GetDatabase();
Step 3: Implement Cache-Aside Logic
csharpCopyEditpublic async Task<Product> GetProductAsync(int productId)
{
    string cacheKey = $"product:{productId}";
    string cachedProduct = await cache.StringGetAsync(cacheKey);

    if (!string.IsNullOrEmpty(cachedProduct))
    {
        // Cache hit
        return JsonConvert.DeserializeObject<Product>(cachedProduct);
    }

    // Cache miss - load from database
    Product product = await _dbContext.Products.FindAsync(productId);

    if (product != null)
    {
        // Save to cache
        await cache.StringSetAsync(cacheKey, JsonConvert.SerializeObject(product), TimeSpan.FromMinutes(30));
    }

    return product;
}
Considerations for Azure Environments
- Set TTLs (Time-to-Live): Always set expiration times for cache keys to prevent stale data buildup.
- Eviction policies: Azure Redis supports LRU eviction if memory limits are hit.
- Cache invalidation: If your data changes frequently, consider evicting or updating cache entries on updates/deletes.
- Monitoring: Use Azure Monitor to track Redis cache usage and performance.
Best Practices
- Use serialization libraries like Newtonsoft.Json or System.Text.Json for object storage.
- Design idempotent and thread-safe cache operations.
- For write-heavy applications, consider Write-Through or Write-Behind caching patterns instead.
The Cache-Aside pattern is a great starting point when introducing caching into your Azure-hosted application. It’s simple to implement and gives developers full control over what gets cached and when.
By combining Azure Cache for Redis with your persistent data layer, you can deliver faster, more scalable applications that are ready to handle growing user demands.
Extra posts:
 Cache-Aside (Lazy Loading) Load Data into a Cache on Demand in AWS
  Data Integration with Microsoft Fabric Unifying Your Data Universe
  Azure Functions vs. Azure Container Apps Choosing Your Serverless Compute
  Global Infrastructure 101 Understanding Data Centers, Regions, and Availability Zones in Azure
  How Microsoft Azure Ensures Data Privacy and Global Compliance | Secure Cloud Solutions
  AZCopy v10 preview available to copy data to azure from AWS s3 buckets