In remote work mode having the ability to access your PC from anywhere is very useful and important to have. Whether you need to reach important files, manage apps or troubleshoot a device Remote Desktop on Windows 11 gives you full access to your computer as if you were just sitting in front of it.
And by the way setting it up is easier than you think.
In this blog, we will go through what Remote Desktop is, how to enable it in Windows 11, how to connect from another device, and how to solve common issues that may arise during setup.
What is Remote Desktop on Windows 11?
Remote Desktop Protocol (RDP) is a Microsoft feature that gives you capability to connect from one computer to another over a network or the internet.
When connected you can do the following:
- Control the remote PC’s desktop
- Open files and applications
- Manage system settings
- Perform technical support tasks
It is widely used by IT professionals, work from home employees, students, and people who travel frequently but need access to their home PCs.
Note: Remote Desktop connection is available on those editions Windows 11 Pro, Enterprise, and Education editions. The Windows 11 Home edition can only act as a client, not a host. If you are using Home edition, you can still connect to other PCs but others cannot remote into yours.
Requirements to Use Remote Desktop
Before we begin setup, make sure you have:
| Requirement | Why It’s Needed |
|---|---|
| Windows 11 Pro/Enterprise | To host Remote Desktop sessions |
| A Microsoft account or local admin account | For login authorization |
| Stable network connection | Smooth remote access |
| PC must stay powered on | Otherwise connection fails |
| Firewall allowing RDP | To prevent blocked connections |
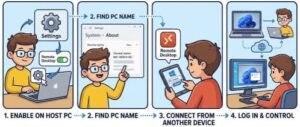
How to Enable Remote Desktop on Windows 11
Follow these steps to turn on Remote Desktop:
Step 1: Open Settings
- Click the Start Menu
- Select Settings
- Go to System

Step 2: Select Remote Desktop
- Scroll down and click Remote Desktop
Step 3: Turn On Remote Desktop
- Toggle the switch to On
- Confirm when a security prompt appears
Windows will automatically adjust firewall rules to allow remote access.

Allow Specific Users Access (Optional)
By default, your administrator account gets access to Remote Desktop. But you can add more users.
Here’s how:
- On the Remote Desktop settings page → click “Select users that can remotely access this PC”
- Click Add
- Enter the user’s name and press OK
This is useful if multiple people need access.

Check and Note Your PC Name
To connect from another device, you’ll need the PC name:
- Go to Settings > System > About
- Look for the Device Name
Write it down — you’ll use it later!
If you plan to connect over the internet, you may use:
- Public IP address
- Dynamic DNS (if the IP changes regularly)
Ensure Remote Desktop is Allowed Through Firewall
Normally this happens automatically, but if not:
- Open Windows Security
- Go to Firewall & network protection
- Click Allow an app through firewall
- Ensure Remote Desktop is checked for both Private and Public networks
How to Connect to Your Windows 11 PC Remotely
Now that Remote Desktop is enabled, here’s how you connect:
Using Another Windows PC
- Open the Remote Desktop Connection app
(Search mstsc in Start menu) - Enter the PC name or IP address
- Click Connect
- Sign in with your Windows account credentials
You will now have full access to the remote PC.

Using Mobile Devices (Android / iPhone / iPad)
- Install the Microsoft Remote Desktop app from the app store
- Tap Add PC
- Type your PC name/IP + account login
- Save and tap to connect
This gives you remote access on the go!
Accessing Your PC Over the Internet
If you want to connect from a different network (not the same Wi-Fi):
- Enable port forwarding on your router
→ Open port 3389 for Remote Desktop - Use your public IP address to connect
Security Tip: Exposing RDP over the internet can attract hacking attempts. It’s safer to use a VPN to connect securely.
Common Remote Desktop Issues & Fixes
| Problem | Fix |
|---|---|
| Unable to connect | Verify Remote Desktop is enabled |
| Wrong credentials | Ensure correct username & password |
| Firewall blocking connection | Manually allow RDP through firewall |
| PC offline or asleep | Change power settings to prevent sleep |
| Using Windows 11 Home as host | Upgrade to Pro |
| Internet access required | Confirm both PCs are online |
If remote access is slow, check your network speed or reduce display resolution in Remote Desktop settings.
Security Tips for Remote Desktop
Because Remote Desktop provides full access to your system, always follow best practices:
- Use a strong password
- Enable Network Level Authentication (NLA)
- Avoid public Wi-Fi, or use VPN encryption
- Keep Windows security updates turned on
Safe remote access ensures your data stays protected.
Setting up Remote Desktop on Windows 11 is a powerful way to take control of your PC from anywhere. Whether you’re helping a family member with troubleshooting, accessing work files from home, or traveling abroad, Remote Desktop keeps you connected.
With just a few simple configuration steps — enabling Remote Desktop, adjusting firewall settings, and knowing your PC name — you can start using remote access confidently.
Extra posts:
 Unlocking Productivity with the Microsoft Remote Desktop Mobile App
  How to Personalize Your Windows 11 Desktop Like a Pro
  Adding Animated Wallpapers to Your Desktop in Windows 11
  Getting Started with Linux A Beginner’s Guide for Windows Users
  Top 10 Windows 11 Tips Every Beginner Should Know