
In the world of microservices, flexibility comes with complexity. Each service is autonomous, has its own database, and runs independently — but with that independence comes the challenge of how clients communicate with these services efficiently and securely.
That’s where the API Gateway pattern comes in. On Azure, implementing this pattern is straightforward and powerful with Azure API Management (APIM).
What is the API Gateway Pattern?
Think of an API Gateway as the front door to your microservices ecosystem. Instead of exposing dozens of separate service endpoints to the outside world, you create one unified entry point.
The gateway’s responsibilities include:
- Routing requests to the appropriate backend microservice.
- Transforming requests and responses to match client needs.
- Securing APIs with authentication and authorization.
- Aggregating data from multiple services into a single response.
In short, it’s the bouncer, concierge, translator, and security guard for your APIs.
Why Use API Gateway on Azure?
Azure’s API Management (APIM) is a fully managed service that lets you:
- Manage APIs centrally.
- Control traffic and throttle requests.
- Enforce security policies (OAuth 2.0, JWT validation, subscription keys).
- Monitor usage with rich analytics.
- Transform payloads between formats (JSON ↔ XML).
By using APIM as your API Gateway, you can shield your microservices from direct exposure and reduce coupling between clients and services.
How the API Gateway Pattern Works in Azure
1. Clients Talk to the Gateway
All client applications (web, mobile, partner integrations) send requests to the Azure API Management endpoint instead of directly contacting the microservices.
Example:
https://api.contoso.com/orders
2. The Gateway Routes Requests
APIM routes the request to the correct backend microservice using policies and API configuration.
Example:
GET /orders→ Orders microservicePOST /customers→ Customer microservice
This keeps the client oblivious to internal URLs, ports, and scaling mechanisms.
3. Policies Add Intelligence
Azure API Management allows you to define policies in XML that act at different stages:
- Inbound (before the request hits the backend)
- Backend (between APIM and microservice)
- Outbound (before sending response to client)
Example:
<inbound>
    <set-backend-service base-url="https://orders-service.azurewebsites.net" />
    <validate-jwt header-name="Authorization" failed-validation-httpcode="401" />
</inbound>
4. Security and Governance
Using APIM as a gateway means:
- You can apply OAuth 2.0 or JWT validation without changing each microservice.
- You can enforce rate limits to prevent abuse.
- You can track every request in Azure Monitor for insights.
Typical Architecture
Here’s a high-level flow:
- Client Request → API Gateway (Azure APIM)
- Policy Execution (auth, transformation, logging)
- Routing to correct microservice endpoint
- Response Aggregation (if needed)
- Client Receives Unified Response
[ Clients ] → [ Azure API Management ] → [ Microservices ]
Best Practices
- Use versioning in API paths (
/v1/orders) to prevent breaking changes. - Keep gateways stateless — store state in backend services, not APIM.
- Monitor and alert using Azure Monitor and Application Insights.
- Minimize payload transformations for performance efficiency.
- Implement caching for frequently accessed data.
The API Gateway pattern in Azure, powered by Azure API Management, gives you a single, secure, and manageable entry point to your microservices.
Instead of clients juggling dozens of endpoints, you give them one consistent API surface — making your architecture more maintainable, scalable, and secure.
If your microservices architecture is starting to feel like a crowded food court, think of the API Gateway as your central cashier: one counter, one payment, and everything gets to the right kitchen.
Extra posts:
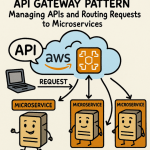 API Gateway Pattern in AWS Managing APIs and Routing Requests to Microservices
  Riding in Tandem Unlocking the Sidecar Pattern in Azure Microservices
  Follow the Thread Distributed Tracing Patterns for Microservices in Azure
 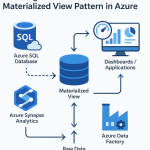 Boosting Performance with the Materialized View Pattern in Azure
  Secret Store Pattern in Azure Using Secure Vaults for Credentials and Secrets
 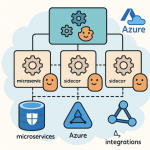 Service Mesh Architecture Pattern in Azure Handling Service-to-Service Communication, Security, and Observability