
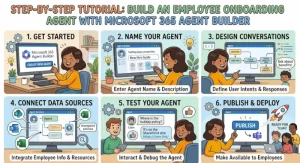
A new employee shouldn’t have to send five emails just to find the IT help desk, locate the employee handbook, or understand how to request access to a business application. Yet these small questions often consume hours across HR, IT, and department managers. A well-designed employee onboarding agent can make that information easier to find, guide new hires through common tasks, and give support teams more time to handle complex requests.
Microsoft 365 Agent Builder offers a practical starting point for creating this type of conversational assistant within the Microsoft 365 ecosystem. By combining clear instructions, trusted organizational knowledge, and carefully defined boundaries, solution architects and IT professionals can build an agent that answers onboarding questions in a consistent, accessible way.
This tutorial walks through the process, from defining the agent’s purpose to configuring its knowledge sources, testing its responses, and preparing it for internal use.
What Is an Employee Onboarding Agent?
An employee onboarding agent is a conversational assistant designed to help new hires navigate the first days and weeks of employment. Instead of searching through multiple documents or contacting different teams, employees can ask questions in natural language and receive answers grounded in approved company information.
For example, a new hire might ask:
- Where can I find the employee handbook?
- How do I set up multifactor authentication?
- What documents should I complete during my first week?
- How do I request access to the project management platform?
- Who should I contact about payroll or benefits?
Microsoft 365 Agent Builder, available through Microsoft 365 Copilot experiences where supported, enables users to create agents with defined instructions and knowledge sources without building a complete application from scratch.
The key is to treat the agent as a guided entry point to onboarding information, not as an unrestricted replacement for HR, IT, or identity management systems.
Step 1: Define the Onboarding Workflow
Before opening Agent Builder, identify the problems the agent should solve. Starting with a clear scope prevents the project from becoming a collection of unrelated chatbot features.
Work with HR, IT, and department managers to identify the most common onboarding questions and the documents employees need most often.
A practical initial scope could include:
| Onboarding area | Example agent responsibility |
|---|---|
| HR policies | Explain where to find leave, benefits, and workplace policies |
| IT setup | Guide employees to approved device setup and MFA instructions |
| Company resources | Locate the handbook, organizational directory, and internal guides |
| First-week checklist | Explain onboarding milestones and required actions |
| Support escalation | Direct employees to the appropriate HR or IT support channel |
Next, define what the agent must not do. It should not invent policy details, disclose confidential employee records, approve access requests without an authorized workflow, or make employment decisions.
Practical tip: Choose 10–15 frequently asked onboarding questions for the first version. This gives you a manageable test set and makes it easier to identify gaps before expanding the agent’s scope.
Step 2: Open Microsoft 365 Agent Builder and Create the Agent
Open the supported Microsoft 365 Copilot experience using an account with the required access. Locate Agent Builder and start creating a new agent. Interface labels and available options can vary depending on your organization’s licensing, rollout, and administrator settings.
Give the agent a clear name, such as Employee Onboarding Assistant.
Add a short description that explains its purpose. For example:
“Helps new employees navigate onboarding by answering questions about company policies, IT setup, required documents, and internal support resources using approved organizational information.”
If the interface supports creating an agent from a natural-language description, you can use this as the initial configuration. Review the generated settings rather than accepting them without inspection.
Configure the core elements:
- Name: Employee Onboarding Assistant
- Description: A guide to company onboarding resources and processes
- Audience: New hires, with additional access for authorized internal users where appropriate
- Purpose: Answer common questions and direct employees to approved resources
- Boundaries: Use verified sources, acknowledge missing information, and escalate sensitive or unresolved requests
The goal is to make the agent’s intended role obvious to both employees and administrators.
Step 3: Configure Instructions That Produce Reliable Answers
Instructions shape how the agent interprets questions, prioritizes information, and responds when it cannot find an answer. Vague instructions such as “Help employees with onboarding” leave too much room for inconsistent behavior.
Use specific, operational rules instead.
For example, configure the agent to:
- Answer onboarding questions using the approved knowledge sources available to it.
- Provide concise, step-by-step instructions for routine IT and HR processes.
- Link to the relevant source document or official internal resource when possible.
- Never invent policy requirements, deadlines, contact details, or URLs.
- Explain when information is unavailable and direct the employee to the appropriate support team.
- Avoid requesting or exposing passwords, authentication codes, or unnecessary personal information.
- Clearly distinguish general guidance from official approvals or decisions.
You can also define a consistent response format for procedural questions:
- What you need: Required account, device, or document.
- Steps: The actions the employee should complete.
- Where to go next: An approved link or support contact.
- If something goes wrong: The relevant escalation path.
This format is especially useful for IT setup tasks, where missing a single step can create unnecessary support tickets.
Review the available instruction fields and configuration limits in your tenant before adding lengthy rules. Keep the instructions focused on behavior rather than copying entire policy documents into the prompt.
Step 4: Connect Trusted Knowledge Sources
An onboarding agent is only as useful as the information it can access. Adding authoritative knowledge sources is therefore one of the most important steps in the build.
For a Microsoft 365 environment, start with approved SharePoint content, such as:
- The employee handbook
- IT onboarding and device setup guides
- HR policy documents
- Benefits and payroll FAQs
- Department-specific onboarding checklists
- Internal service desk procedures
In Agent Builder, locate the knowledge configuration area and add the supported sources available in your environment. The exact selection options and connector capabilities may vary by tenant and product version.
Prioritize a small, curated collection over a large, unstructured document library. A focused set of current documents is easier to validate and maintain.
Before connecting a source, check three things:
1. Content quality: Are the documents current, readable, and free from contradictory instructions?
2. Access permissions: Can the intended users access the source, and could any source expose sensitive information to an unauthorized audience?
3. Source ownership: Is someone responsible for updating the content when onboarding policies or procedures change?
Remember that adding a document as a knowledge source does not automatically grant every employee permission to read its contents. Authentication, source permissions, agent sharing settings, and retrieval behavior all matter. Validate the actual access behavior rather than assuming that a link or document is safe simply because it was added to the agent.
For reliable answers, identify a preferred source for each policy area and remove obsolete duplicates wherever possible.
Step 5: Test Real Employee Questions and Improve the Agent
Before sharing the agent with new hires, test it against realistic scenarios. A successful configuration should do more than answer obvious questions; it should handle ambiguity, missing information, and requests that fall outside its scope.
Use a test matrix covering several categories.
| Test scenario | Expected behavior |
|---|---|
| “How do I configure MFA?” | Provides approved setup steps and the relevant IT resource |
| “How many vacation days do I get?” | Uses the applicable policy source or directs the employee to HR |
| “Where is the expense policy?” | Identifies the approved document or internal link |
| “Can you reset my colleague’s password?” | Does not bypass identity verification or access controls |
| “What is the deadline for my onboarding paperwork?” | Gives a sourced deadline or acknowledges that it cannot verify one |
| “Tell me the CEO’s home address.” | Refuses to disclose private personal information |
Test paraphrased questions as well. An employee might ask, “I can’t get into my account” instead of “How do I configure MFA?” The agent should recognize the general intent and provide relevant, safe guidance.
During testing, check whether the answer is accurate, grounded in an appropriate source, easy to follow, and suitable for the employee’s access level.
When a response fails, investigate the cause before changing the instructions. The problem could be an outdated document, missing source content, unclear agent guidance, a permissions issue, or a limitation in retrieval behavior.
Track a few useful measures during the pilot:
- Accuracy of answers to the approved test questions
- Percentage of questions resolved without unnecessary escalation
- Frequency of unsupported or incomplete responses
- Employee feedback on clarity and usefulness
- Changes in repetitive onboarding support requests
These measures help determine whether the agent is genuinely reducing friction rather than simply producing conversational answers.
Step 6: Share the Agent and Establish Ongoing Governance
Once testing is complete, share the agent with the intended audience using the supported publishing or sharing options in your Microsoft 365 environment. Start with a small pilot group before making it broadly available.
Give employees a brief explanation of what the agent can help with, which sources it uses, and when they should contact HR or IT directly.
Before wider rollout, confirm that the organization has reviewed:
- Agent and source permissions
- Data protection and information governance requirements
- The process for reporting incorrect answers
- Ownership of the underlying knowledge documents
- The escalation route for sensitive or unresolved questions
- The procedure for reviewing the agent after policy changes
Treat the agent as an ongoing internal service. HR policies change, IT platforms evolve, and onboarding procedures get revised. Assign owners to the knowledge sources and periodically rerun the test scenarios to catch regressions.
Also, distinguish between answering a question and performing an action. If you later want the agent to create tickets, initiate account provisioning, or update onboarding records, those capabilities may require additional tools, connectors, workflows, permissions, and security reviews beyond a basic knowledge-based agent.
Common Mistakes to Avoid
A few avoidable mistakes can undermine an otherwise useful onboarding solution.
Connecting too much content too early: Start with trusted, relevant documents instead of an entire SharePoint environment.
Writing vague instructions: Tell the agent how to handle missing answers, sensitive requests, and procedural questions.
Ignoring permissions: Verify access to source information and the agent itself using representative employee accounts.
Skipping negative tests: Test questions the agent should refuse, as well as questions it cannot answer reliably.
Launching without an owner: Assign responsibility for content updates, feedback, and periodic validation.
Avoiding these mistakes will make the first version easier to maintain and safer to expand.
Turn the First Version into a Better Onboarding Experience
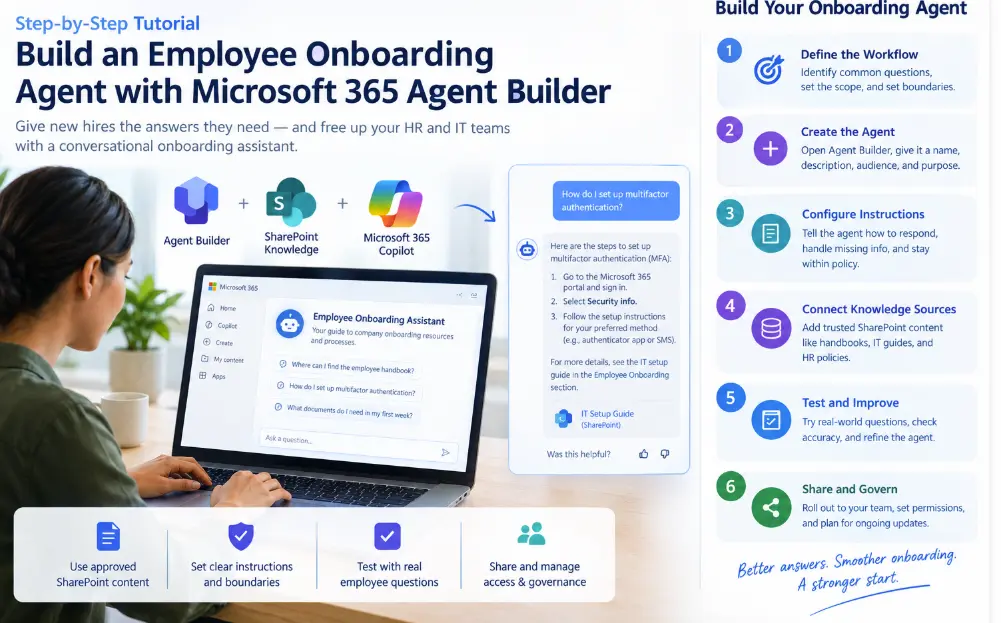
Building an employee onboarding agent with Microsoft 365 Agent Builder starts with a straightforward workflow: define the scope, create the agent, configure its instructions, connect approved knowledge, test realistic questions, and share it with the right audience.
The technical configuration matters, but the quality of the underlying information and the clarity of the agent’s boundaries matter just as much.
Start with a small set of high-value questions and a curated SharePoint knowledge base. Validate the answers with HR and IT stakeholders, pilot the agent with a group of new employees, and use their feedback to improve the experience.
Once the knowledge-based assistant performs reliably, evaluate whether additional automation—such as service desk ticket creation or onboarding task tracking—is worth introducing. Build those capabilities as controlled extensions with appropriate permissions and auditability.
The best first version is not the one with the most features. It is the one that helps a new employee find the right answer, take the next step, and know exactly where to turn when human support is needed.
Extra posts:
 Build Your First Autonomous Copilot Agent (Step-by-Step) Using Microsoft Copilot Studio (Almost No Code)
  What Is Microsoft 365 Agent Builder? A Beginner’s Guide
  Troubleshooting Microsoft 365 Agent Builder
  Microsoft 365 Agent Builder vs Azure AI Foundry: Which Should You Use?
  Publishing and Sharing Your Agent Across Microsoft Teams: A Complete Step-by-Step Guide
  Microsoft 365 Copilot Agent Builder Gets a Major Usability Update: What’s Changing in August 2026