
Windows Sandbox is one of those Windows 11 features that feels almost magical when it works. You can open an isolated Windows environment, test an application, browse a suspicious file, or experiment with settings without affecting your main Windows installation.
But when Windows Sandbox stops working, the experience can be frustrating. Sometimes the Sandbox option is missing altogether. In other cases, it refuses to start, opens and closes immediately, gets stuck while loading, or displays an error related to virtualization.
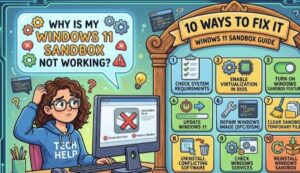
If you are asking, “Why is my Windows 11 Sandbox not working?”, the problem is usually connected to Windows features, virtualization settings, system files, edition requirements, or conflicts with other virtualization software.
The good news is that most Windows Sandbox problems can be fixed without reinstalling Windows.
In this guide, we will look at the most common reasons Windows Sandbox fails and walk through practical solutions you can try.
What Is Windows Sandbox?
Windows Sandbox is a lightweight, temporary desktop environment included with certain editions of Windows. It allows you to run applications and test files in an isolated environment.
Anything you install or change inside the Sandbox is normally discarded when you close it.
This makes it useful for:
- Testing unfamiliar applications
- Opening potentially unsafe files
- Trying Windows settings
- Testing scripts
- Checking software before installing it on your main system
- Reproducing application problems
- Experimenting without changing your regular Windows environment
Because Sandbox relies on virtualization technologies underneath, several Windows components and hardware settings need to be working correctly.
Why Is Windows 11 Sandbox Not Working?
There isn’t one single reason why Windows Sandbox may fail. Common causes include:
- Your Windows edition does not support Windows Sandbox.
- Hardware virtualization is disabled.
- Required Windows features are turned off.
- Hyper-V-related components are not functioning correctly.
- Windows system files are corrupted.
- Windows is outdated or has a pending update.
- Your computer has insufficient available resources.
- Another virtualization configuration is interfering with Sandbox.
- A recent Windows change or configuration has broken a required component.
- Sandbox configuration files contain an incorrect setting.
Let’s go through the fixes one by one.
1. Check Whether Your Windows 11 Edition Supports Sandbox
Before changing anything, check your Windows edition.
Windows Sandbox isn’t available on every Windows 11 edition. It is generally intended for supported professional and business-oriented editions rather than Windows 11 Home.
To check your edition:
- Press Windows + I to open Settings.
- Select System.
- Scroll down and choose About.
- Look under Windows specifications.
- Check the Edition field.
If you are running an edition that does not support Windows Sandbox, the feature may not appear in Windows Features.
This is one of the easiest issues to overlook, especially if you recently upgraded or changed Windows editions.
2. Make Sure Virtualization Is Enabled
Windows Sandbox depends on hardware virtualization. If virtualization is disabled in your computer’s firmware, Sandbox may fail to start even when the Windows feature itself is installed correctly.
The setting is commonly called something like:
- Intel Virtualization Technology
- Intel VT-x
- AMD-V
- SVM Mode
- Virtualization Technology
The exact name depends on your computer’s motherboard and processor.
You can check whether virtualization is enabled from Windows:
- Press Ctrl + Shift + Esc to open Task Manager.
- Select Performance.
- Click CPU.
- Look for Virtualization.
If it says Disabled, you will need to enable virtualization in your computer’s UEFI/BIOS settings.
The steps for entering BIOS vary by manufacturer, so look for the virtualization setting rather than following a generic sequence of menu names.
After enabling virtualization, restart Windows and try Sandbox again.
3. Turn Windows Sandbox Off and On Again
Sometimes the Sandbox installation itself can become misconfigured. A simple way to refresh the feature is to disable it, restart the computer, and then enable it again.
To do this:
- Press the Windows key.
- Search for Turn Windows features on or off.
- Open the result.
- Find Windows Sandbox.
- Clear the checkbox.
- Click OK.
- Restart your PC.
- Open Windows Features again.
- Enable Windows Sandbox.
- Restart Windows once more if requested.
Now try launching Sandbox.
This process can resolve problems caused by an incomplete or damaged feature installation.
4. Check Related Virtualization Features
Windows Sandbox doesn’t operate completely on its own. It relies on virtualization components within Windows.
Depending on your configuration, related features such as Hyper-V, Virtual Machine Platform, and other virtualization components may be relevant.
Open Turn Windows features on or off and review the virtualization-related options available on your system.
Don’t randomly enable every Windows feature, however. More isn’t always better, and unnecessary components can introduce additional complexity.
If Sandbox previously worked and stopped after you changed virtualization settings, consider reversing those changes and testing again.
5. Update Windows 11
An outdated Windows installation can also cause Sandbox problems.
Microsoft regularly releases Windows updates containing security fixes, bug fixes, and improvements to Windows components. Since Sandbox is integrated into Windows, problems with underlying system components can sometimes be resolved through updates.
To check for updates:
- Open Settings.
- Select Windows Update.
- Click Check for updates.
- Install available updates.
- Restart your computer.
If an update has already been downloaded but Windows is waiting for a restart, restart the computer before doing more troubleshooting.
It is also worth checking whether your Sandbox problem started immediately after a major Windows update. If so, the timing can provide an important clue.
6. Repair Corrupted Windows System Files
Windows Sandbox may fail if important Windows system files are damaged.
Fortunately, Windows includes built-in tools that can check and repair system files.
Open Windows Terminal or Command Prompt as an administrator and run:
sfc /scannowWait for the scan to finish. Depending on your system, this can take some time.
If Windows reports that it found and repaired corrupted files, restart your PC and test Sandbox again.
You can also use the Deployment Image Servicing and Management tool if the problem continues:
DISM /Online /Cleanup-Image /RestoreHealthAfter DISM finishes, run SFC again:
sfc /scannowThen restart Windows.
These tools are useful because they can repair problems affecting Windows components without requiring a complete Windows reinstall.
7. Check Your Available System Resources
Windows Sandbox creates a temporary virtualized environment, so your PC needs enough resources to run it.
If your computer is already under heavy load, Sandbox may be slow to start or may fail unexpectedly.
Before launching Sandbox, close applications that are consuming significant amounts of memory or CPU.
You can check resource usage in Task Manager:
- Press Ctrl + Shift + Esc.
- Select Processes.
- Check CPU and Memory usage.
- Close unnecessary applications.
- Try opening Sandbox again.
This is particularly important on computers with limited RAM or older processors.
8. Check Whether Your Sandbox Configuration Is Causing the Problem
Advanced users can customize Windows Sandbox using configuration files with the .wsb extension.
These files can control things such as networking, mapped folders, startup commands, and other Sandbox settings.
A mistake in a custom configuration file can prevent the Sandbox environment from starting correctly.
If you normally launch Sandbox using a .wsb file, try launching Windows Sandbox directly from the Start menu instead.
If the normal Sandbox works but your custom .wsb file doesn’t, the problem is probably related to the configuration rather than Windows Sandbox itself.
Temporarily remove custom settings and test with a basic configuration.
9. Consider Conflicts With Other Virtualization Software
If you use virtualization software such as virtual machines for development, testing, or other purposes, check whether a recent configuration change coincided with the Sandbox problem.
Virtualization technologies can interact with each other in complicated ways. Changes involving Hyper-V, virtual machine platforms, security settings, or virtualization-based features can affect how other virtualization tools behave.
If Sandbox stopped working after installing or changing another virtualization product, investigate that change first.
Avoid disabling security or virtualization features permanently just to make one application work. Instead, identify which component is causing the conflict and choose the configuration that fits your needs.
10. Restart After Major Changes
This sounds almost too simple, but it matters.
Some Windows features don’t become fully active immediately after you enable or disable them. A restart may be required before virtualization components and system services reload correctly.
If you have:
- Enabled virtualization in BIOS/UEFI
- Enabled Windows Sandbox
- Changed Hyper-V-related features
- Installed Windows updates
- Repaired system files
restart the computer before concluding that the fix didn’t work.
What If Windows Sandbox Still Doesn’t Work?
If you have tried the steps above and Sandbox still refuses to start, don’t immediately assume that Windows itself needs to be reinstalled.
Start by identifying exactly where the failure occurs.
Ask yourself:
- Is Windows Sandbox visible in Windows Features?
- Does Task Manager show virtualization as enabled?
- Does Sandbox fail immediately or after loading?
- Did the problem start after a Windows update?
- Did you recently install virtualization software?
- Does normal Sandbox work while a custom
.wsbfile fails? - Are other Windows virtualization features working?
The answers can narrow down the cause considerably.
You can also check Event Viewer for Windows errors related to virtualization or Sandbox. This is more technical, but it can provide useful information when the normal troubleshooting steps don’t solve the problem.

When Windows Sandbox is not working, the problem can initially seem mysterious because there isn’t always a clear error message explaining what went wrong.
In many cases, though, the cause is relatively straightforward: virtualization is disabled, the Windows feature isn’t installed correctly, system components are damaged, Windows needs an update, or another virtualization configuration is interfering.
Start with the simplest checks. Confirm that your Windows edition supports Sandbox, make sure hardware virtualization is enabled, refresh the Sandbox feature, and install pending Windows updates.
If that doesn’t work, move on to system-file repairs with SFC and DISM and investigate virtualization-related settings.
Most importantly, change one thing at a time. That makes it much easier to identify what actually fixed the problem.
With the right configuration, Windows Sandbox can be an extremely useful tool for safely testing software and files without cluttering or changing your main Windows environment.
Extra posts:
 Complete Windows Sandbox Guide: How to Use Windows Sandbox in Windows 11
  How to Use Windows 11 Sandbox for Safe Testing
  10 Ways to Customize the Start Menu in Windows 11
  How to Fix Windows 11 Problems Without Calling IT
  Windows 11 Update Stuck? Here’s How to Fix It (Expert Guide)
  How to Fix 100% Disk or CPU Usage in Windows 11