
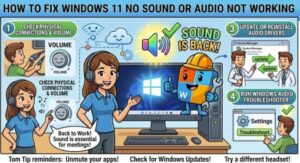
There’s nothing more frustrating than sitting down to watch a video, join a meeting, play music, or use your favorite game on Windows 11, only to discover that there’s no sound. You turn up the volume, check the speaker, and maybe even restart the computer—but nothing happens.
Fortunately, Windows 11 no sound problems are usually caused by something relatively simple, such as the wrong output device, muted volume, an outdated audio driver, or a Windows audio service that has stopped working.
In this guide, we’ll walk through the most effective ways to fix Windows 11 audio not working, starting with the quickest solutions and moving toward more advanced troubleshooting steps.
Why Is There No Sound on Windows 11?
Before changing anything, it helps to understand what might be causing the problem.
Windows 11 can lose audio for several reasons, including:
- Your computer is muted.
- The wrong playback device is selected.
- Bluetooth headphones are connected but not being used as the output.
- The audio driver is outdated or corrupted.
- Windows Audio services are not running correctly.
- An application has its own volume turned down.
- Audio enhancements are causing conflicts.
- A recent Windows update has created an audio-related issue.
- Your speakers, headphones, or audio cable have a hardware problem.
The good news is that you usually don’t need to reinstall Windows to solve the issue. Try the following solutions one at a time.
1. Check the Volume and Mute Settings
This sounds obvious, but it’s one of the most common reasons for having no sound.
Click the speaker icon on the Windows 11 taskbar. Make sure the volume isn’t set to zero and that your computer isn’t muted.
You can also press the volume-up key on your keyboard if your laptop has dedicated media controls.
If you are using headphones, check whether they have a separate volume control. Some USB headsets and Bluetooth headphones also have independent volume settings.
If you can see the volume moving but still can’t hear anything, move on to the next step.
2. Make Sure Windows Is Using the Correct Output Device
One of the most common Windows 11 audio problems occurs when the computer sends sound to the wrong device.
For example, you might have Bluetooth headphones, a monitor with built-in speakers, and your laptop speakers connected at the same time. Windows may choose the monitor or another device as the default output.
To check:
- Click the speaker icon on the taskbar.
- Click the arrow next to the volume control.
- Look at the available output devices.
- Select the speakers or headphones you actually want to use.
- Play a sound to test it.
You can also open Settings > System > Sound and check the Output section.
If switching the output device immediately brings your audio back, the problem was simply that Windows was sending sound somewhere else.
3. Restart Your Computer
A simple restart can fix surprisingly many Windows 11 audio issues.
Audio services and drivers can occasionally stop responding after waking your computer from sleep, connecting a Bluetooth device, installing software, or applying an update.
Save your work and restart Windows 11 normally. After the computer starts again, test the sound.
If the problem keeps coming back after every restart, you’ll want to continue troubleshooting rather than relying on reboots.
4. Run the Windows 11 Audio Troubleshooter
Windows includes built-in troubleshooting tools designed to automatically identify common audio problems.
Open Settings > System > Troubleshoot > Other troubleshooters.
Find the option related to Audio or Playing Audio and run the troubleshooter.
Windows may check your selected output device, audio services, volume settings, and other common configuration problems.
Follow the recommendations it provides and test your audio afterward.
The troubleshooter doesn’t fix every problem, but it’s worth trying because it can identify configuration issues without requiring you to manually change advanced settings.
5. Check the Volume Mixer
Sometimes Windows has sound enabled, but a specific application is muted.
For example, your browser may have no audio while Windows system sounds work normally.
Right-click the speaker icon and open the Volume mixer. Check the volume levels for individual applications.
Make sure:
- Your browser isn’t muted.
- Your media player isn’t muted.
- Your game isn’t muted.
- The application volume is turned up.
- The correct output device is selected for the application.
This is especially useful if Windows 11 sound works in some applications but not others.
6. Disconnect and Reconnect Your Headphones or Speakers
If you’re using external audio equipment, disconnect it and connect it again.
For wired headphones, make sure the plug is fully inserted. If you’re using a USB headset, try another USB port.
For Bluetooth headphones:
- Open Settings.
- Go to Bluetooth & devices.
- Disconnect the headphones.
- Turn Bluetooth off and back on.
- Reconnect the headphones.
- Check the Windows sound output again.
If possible, test another pair of headphones or speakers. This can help determine whether the issue is with Windows or the audio hardware itself.
7. Update the Audio Driver
A faulty or outdated audio driver can cause serious sound problems in Windows 11.
To check your driver:
- Right-click the Start button.
- Select Device Manager.
- Expand Sound, video and game controllers.
- Find your audio device.
- Right-click it and select Update driver.
- Choose the option to search automatically for drivers.
You can also check the computer manufacturer’s website for the latest audio driver. For laptops and branded desktops, manufacturer-provided drivers can sometimes work better than generic Windows drivers.
If the problem started immediately after a driver update, you can also check whether the Roll Back Driver option is available.
8. Reinstall the Audio Driver
If updating the driver doesn’t help, the driver may be corrupted.
Open Device Manager, expand Sound, video and game controllers, right-click your audio device, and choose Uninstall device.
Restart your computer afterward. Windows may automatically reinstall the necessary driver.
If it doesn’t, download the correct audio driver from your computer or motherboard manufacturer’s official support website.
Be careful when downloading drivers from random third-party websites. Using the manufacturer’s official driver is generally the safer option.
9. Restart Windows Audio Services
Windows relies on background services to handle audio. If one of these services isn’t running correctly, you may suddenly lose all sound.
Press Windows + R, type services.msc, and press Enter.
Look for:
- Windows Audio
- Windows Audio Endpoint Builder
Right-click each service and choose Restart.
Also check that their startup type isn’t disabled.
After restarting the services, play a video or system sound to see whether the audio has returned.
10. Turn Off Audio Enhancements
Windows audio enhancements can sometimes improve sound quality, but they can also create compatibility problems.
If you’re experiencing crackling, distorted audio, very low volume, or no sound at all, try disabling them.
Go to Settings > System > Sound, select your output device, and look for audio enhancement or processing options.
Disable available enhancements and test the audio again.
If the sound starts working, you can later enable individual enhancements to determine which setting was causing the problem.
11. Check the Default Audio Format
Another possible cause is an incompatible audio format.
Open your sound device’s properties and look for the advanced audio settings. Try selecting a standard format supported by your hardware.
After changing the format, click Test and see whether you hear anything.
This solution is particularly worth trying if you recently installed a new sound card, USB audio device, headset, or other audio hardware.
12. Check Windows Update
Sometimes an audio problem is caused by a Windows component rather than your hardware.
Go to Settings > Windows Update and check for available updates.
If Microsoft has released an update that addresses your particular issue, installing it may solve the problem.
On the other hand, if your sound stopped working immediately after a Windows update, consider checking the update history and troubleshooting the most recent update.
Avoid removing updates unless you’re confident the update is responsible and you’ve tried less disruptive solutions first.
13. Check Your Monitor or HDMI Audio
If you’re connecting your computer to a monitor or TV using HDMI or DisplayPort, Windows may automatically switch the audio output to that display.
This can make it appear as though your speakers suddenly stopped working.
Open Settings > System > Sound and check the selected output device.
If you want sound from your laptop or desktop speakers, select those speakers instead of the HDMI or DisplayPort device.
If you actually want sound through the monitor or TV, make sure the display has working speakers and isn’t muted.
14. Try System Restore or Other Recovery Options
If your sound was working perfectly until you installed a driver, application, or system update, Windows recovery options may help.
If you have a suitable restore point, System Restore can return system settings and drivers to an earlier state without removing your personal files.
This should generally be considered after simpler solutions have failed.
What If Nothing Fixes the Sound?
If you’ve tried all of the steps above and Windows 11 still has no sound, the problem may be hardware-related.
Try your headphones or speakers on another computer or phone. If they don’t work there either, the hardware may be defective.
You can also test another audio device on your Windows 11 computer. If a second headset works normally, the original device may be the problem.
For desktop PCs, check the physical audio connections and make sure speakers are connected to the correct port. If you’re using a dedicated sound card, check whether it is properly installed.
If your computer has recently suffered physical damage, liquid exposure, or a hardware failure, consider getting professional assistance.

A Windows 11 no sound problem can be annoying, but it doesn’t necessarily mean that your speakers or computer are broken. In many cases, the solution is as simple as selecting the correct output device, unmuting an application, reconnecting headphones, or restarting the Windows Audio service.
If those basic fixes don’t work, move on to your audio driver, Windows updates, audio enhancements, and device settings.
The best approach is to troubleshoot systematically. Change one thing at a time and test the sound after each step. That makes it much easier to identify what actually fixed the problem.
With a little troubleshooting, you should be able to get your Windows 11 audio working again without resorting to drastic measures such as reinstalling the entire operating system.
Extra posts:
 How to Fix Windows 11 Taskbar Not Working
  Why Is My Windows 11 Sandbox Not Working? 10 Ways to Fix It
  How to Fix Microsoft Copilot Not Working on Windows: Easy Solutions That Actually Help
  Best AI Tools for Audio Revolutionizing Sound with Artificial Intelligence
  How to Record Audio and Screen Together in Windows 11: A Complete Beginner-to-Pro Guide
  How to Fix Windows 11 Not Responding